
Adding Background to the Layout
Published: Updated:
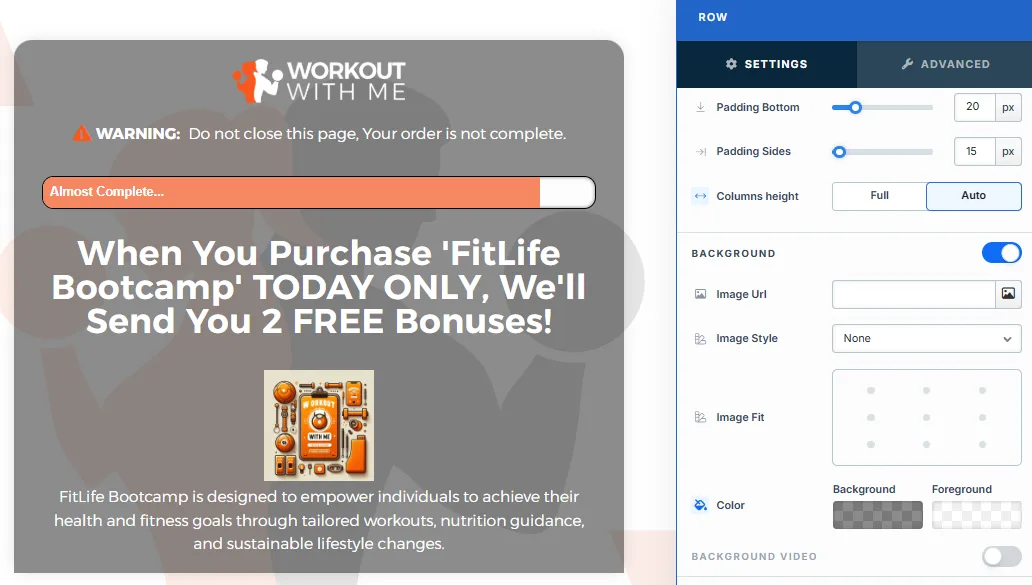
Backgrounds play an essential role in shaping the visual identity of your pages in ClickFunnels. Whether you’re customizing the entire page or specific containers such as sections, rows, columns, or elements, ClickFunnels provides various background customization options, including colors, images, and videos. This article explains how to apply and optimize backgrounds for your page layouts, ensuring professional and visually appealing designs.
Requirements
Section titled “Requirements”-
An active ClickFunnels account
-
A page created in your workspace
Understanding Backgrounds
Section titled “Understanding Backgrounds”In ClickFunnels, backgrounds can be used to define the look and feel of your layouts. Depending on the container type, you can apply:
-
Background Color: Available for almost all layout types, from sections to individual elements.
-
Background Image: Supported in containers like sections, rows, columns, and several elements.
-
Background Video: Embed a video as a background for larger containers like sections, rows, and flex containers to add dynamic visual appeal.
These options allow you to create visually stunning designs while aligning with your brand’s identity.
Accessing Background Settings
Section titled “Accessing Background Settings”-
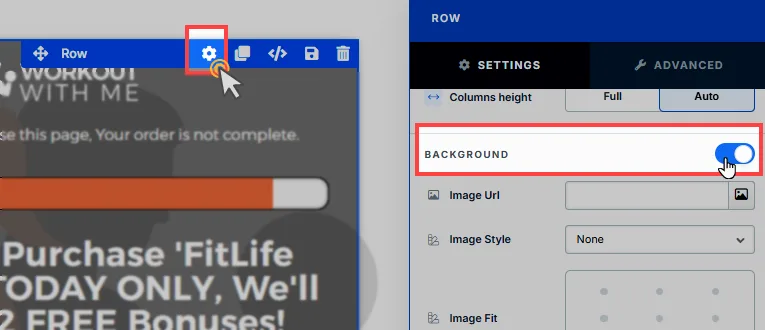
Hover over the container (section, row, columns, flex container, or element) you want to customize and click on the Settings icon.
-
Toggle the Background option to enable background settings.
-
In the Background settings, apply a color, image, or video as background to the container.
-
Click Save to save the page.
Applying Background Color
Section titled “Applying Background Color”Adding a background color to your container in ClickFunnels allows you to customize its appearance and align it with your branding. Follow these steps to apply a background color effectively:
-
Enable the Background settings for your container (e.g., section, row, column, or element).
-
Click on the Background color field.
-
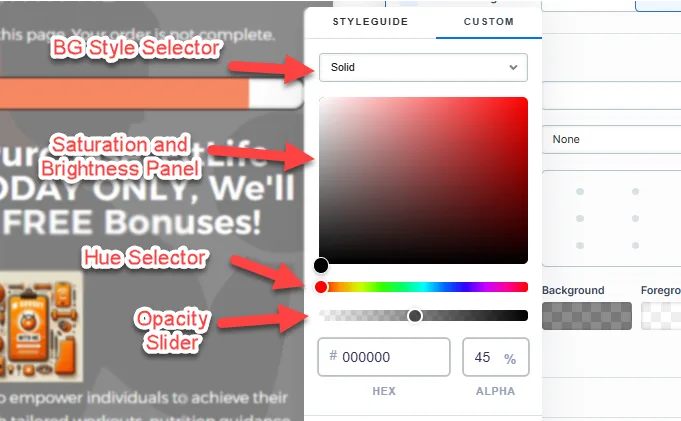
Select a solid color using the Hue Selector and Saturation and Brightness Panel. Choose a color that complements your page design and ensures readability for overlaid content.
-
Adjust settings like transparency or gradients for advanced customization (explained below).
-
Preview your design and click Save to apply the changes.
Adjusting Transparency with Opacity
Section titled “Adjusting Transparency with Opacity”ClickFunnels allows you to modify the opacity of your background color to make it partially transparent:
-
Use the Opacity Slider or Alpha field to set the transparency level in the Color Picker.
-
0% opacity means the background is completely invisible, 100% opacity means the background is fully solid, and 50% opacity makes the background partially transparent, allowing the content or design behind it to show through.
Creating Gradient Background
Section titled “Creating Gradient Background”The gradient option offers a dynamic blend of multiple colors for a visually appealing design. In ClickFunnels, you can easily create gradients by following these steps:
-
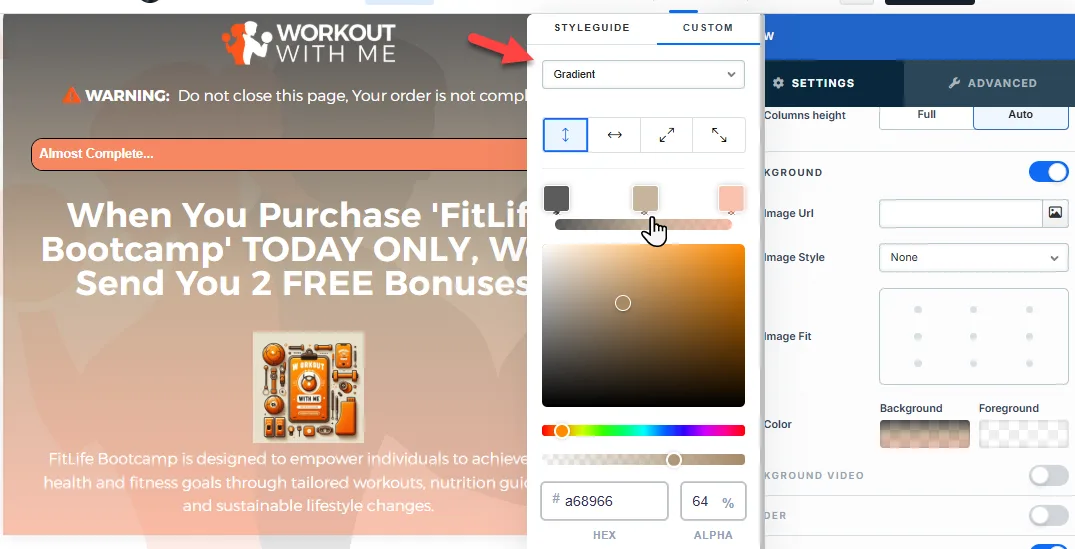
In the Color Picker » Style Selector, switch the background type from Solid to Gradient.
-
Add and Customize Color Stops:
-
Click the gradient bar to add color stops. By default, ClickFunnels provides a gradient with two color stops.
-
Click on a color stop to open the color selector and choose a color for that point.
-
Add more stops to create complex gradients as needed.
-
-
Use the Direction Selector (arrows) to adjust the angle of the gradient. Choose horizontal, vertical, diagonal, to match your design.
-
Preview the gradient in your layout to ensure it enhances the design and maintains readability.
Applying Background Image
Section titled “Applying Background Image”To use an image as a background:
-
In the Background settings, add your image using the Image URL field.
-
Image URL: Enter the background image URL or upload one directly in the ClickFunnels image gallery.
-
Image Style: Controls how the background image is displayed within the container.
-
None: Displays the background image in its original size and position without additional styling, possibly leaving gaps if the image is smaller than the container.
-
Full Center: Centers the image within the container without resizing, which may leave blank spaces if the image is smaller than the container.
-
Full Center (Parallax): Centers the image and applies a parallax scrolling effect, creating a layered look as the image moves independently of the main content.
-
Fill 100% Width: This option expands the image to cover the container’s full width, maintaining its aspect ratio and possibly cropping vertically.
-
Fill 100% Width & Height: This stretches the image to fill both the width and height of the container, cropping parts of the image to maintain the aspect ratio.
-
No Repeat: Displays the image once without repeating; any unused space will remain empty.
-
Repeat: Tiles the image across the container, covering width and height.
-
Repeat Horizontally: Repeats the image across the container’s width only.
-
Repeat Vertically: Stacks the image vertically along the container’s height.
-
-
Image Fit: Position the image within the container (e.g., center, top-left, bottom-right) for better alignment. This setting appears when Contain or Scale-down is selected under Image Style.
Background vs. Foreground
Section titled “Background vs. Foreground”-
Background: This is the main color or image that sits at the back of your container. It’s the base layer that gives your section, row, or column its look.
-
Foreground: This color layer sits on top of the background. You can use it to add effects like a transparent overlay, making text or other elements easier to read.
Think of it this way: The background is like the wall in a room, the background image is like wallpaper that decorates the wall, and the foreground is like a sheer curtain that softens or changes how the wall or wallpaper looks. If the wallpaper (background image) is torn or missing, the wall color (background color) shows through. Finally, the content is like the furniture placed in front that people focus on and interact with.
Adding an Overlay to a Background Image
Section titled “Adding an Overlay to a Background Image”To create an overlay effect with a background image in ClickFunnels, start by adding your image in the Background Settings and adjusting its position using the Image Style and Image Fit options. Then, apply a Foreground Color with transparency to create a subtle overlay that enhances readability for any overlaid content. While the background color won’t be visible when the image loads, it serves as a fallback in case the image fails to load due to a missing source or slow network. This ensures your design remains consistent and visually appealing.
Applying Video as Background
Section titled “Applying Video as Background”ClickFunnels allows you to add engaging background videos to containers such as Entire Page, Sections, Rows, and Flex Containers. Background videos can make your page visually dynamic but should be used thoughtfully to ensure accessibility and performance.
Steps to Apply a Background Video:
Section titled “Steps to Apply a Background Video:”-
Access the Background Settings for the container (e.g., Entire Page, Section, Row, or Flex Container).
-
In the Background settings, toggle the Background Video option.
-
Paste the video link (YouTube or Vimeo) into the Video URL field.
-
Check how the video looks on your page and ensure it doesn’t interfere with overlaid text or buttons.
-
Set a Background Color as a fallback to ensure your design remains intact if the video fails to load due to network issues or a missing source.
-
Click Save to apply the background video to your container.
To add a dynamic video background:
-
In the Background settings, toggle the Background Video option.
-
- Paste the link to your video (from YouTube or Vimeo) into the Video URL field.
-
Preview the Video:
- Ensure the video aligns with your design and does not interfere with text readability.
-
Best Practices for Background Videos:
-
Use subtle videos with minimal motion to avoid overwhelming users.
-
Avoid using videos for critical content, as background videos don’t include playback controls.
-
By focusing on these application-specific instructions, readers can quickly implement background color, images, and videos without redundancy.