
How to Set Up Upgrade and Downgrade Options for Subscription Products
Published: Updated:
The upgrade and downgrade feature allows customers to easily switch between subscription plans whenever they need to. It’s a simple way to offer flexibility and ensure your products meet their changing needs. In this article, you’ll learn how to set up this feature for your subscription products, step by step, so your customers can move between plans effortlessly. 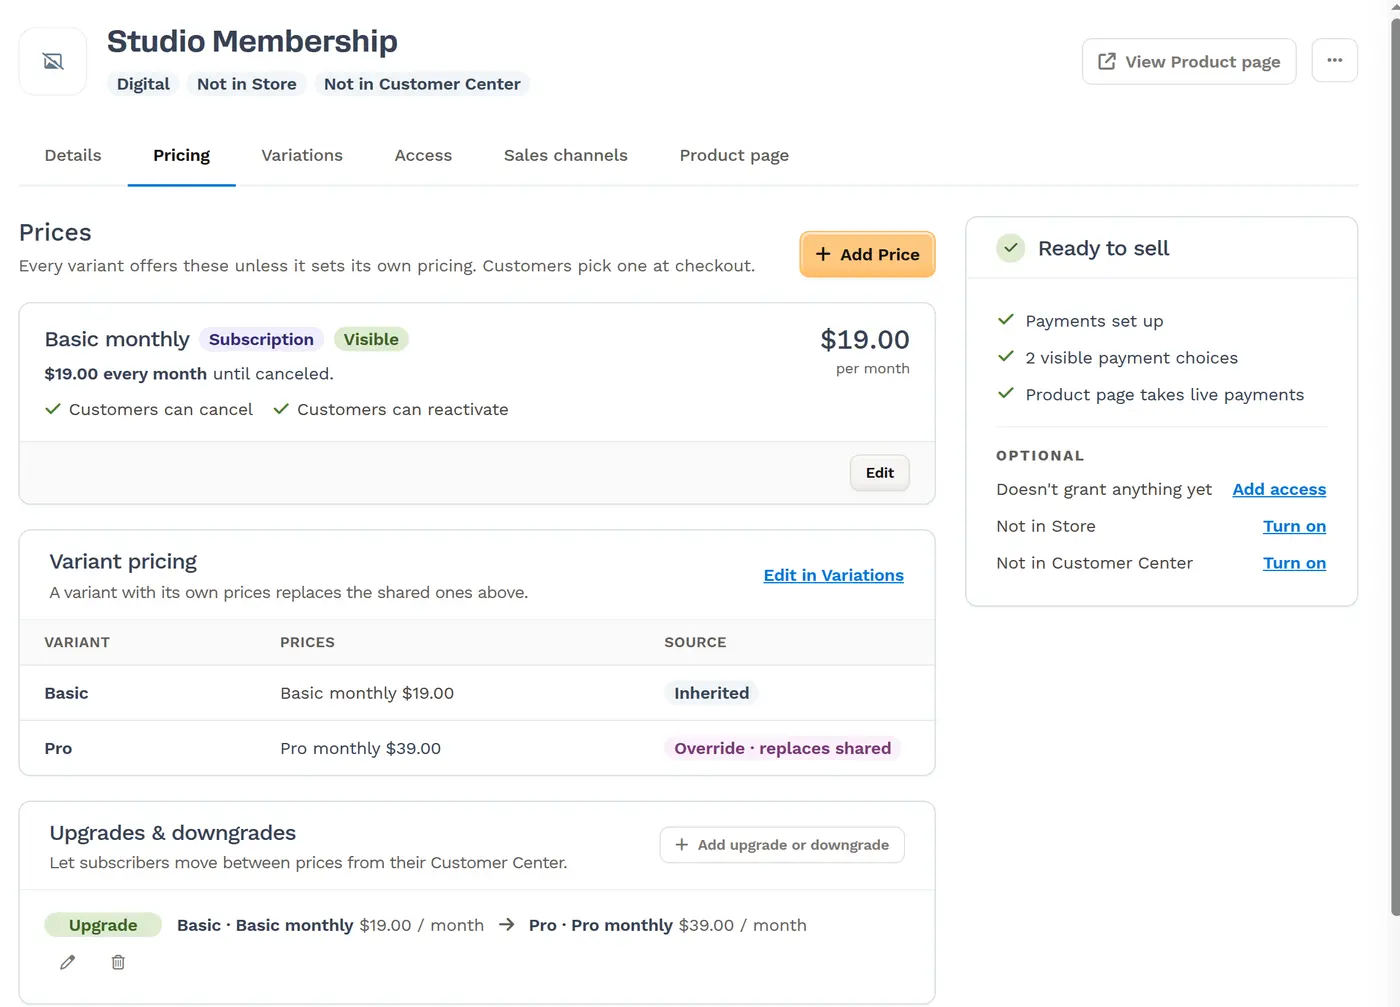
Requirements
Section titled “Requirements”-
An active ClickFunnels account
-
Payments AI connected to the workspace (to use Stripe, connect it through Payments AI), or an existing direct Stripe connection
Understanding the Upgrade and Downgrade Feature
Section titled “Understanding the Upgrade and Downgrade Feature”The upgrade and downgrade feature is designed to give customers the flexibility to move between subscription plans as their needs change. This functionality is especially useful for businesses offering tiered plans, such as basic, standard, and premium subscriptions.
For example, imagine you run an online fitness platform with three subscription tiers:
-
Basic Plan($29/month): Access to on-demand videos. -
Standard Plan($79/month): Includes everything in the Basic Plan plus live classes. -
Premium Plan($129/month): Adds personalized coaching to the Standard Plan features.
If a customer starts with the Basic Plan and later decides they want live classes, they can upgrade to the Standard Plan. Similarly, a Premium Plan customer who no longer needs coaching can downgrade to the Standard Plan.
This feature simplifies the process for customers by allowing them to adjust their plans from their Customer Center or directly through the checkout process, without needing to contact support or cancel their subscription.
By offering this level of flexibility, you create a better experience for customers and make it easier to retain them over the long term.
Setting Up Products for Upgrade/ Downgrade
Section titled “Setting Up Products for Upgrade/ Downgrade”Upgrade and downgrade paths connect the variants of one product, so the product needs a variant for each plan. A product without variants doesn’t show the Upgrades & downgrades card, because the Customer Center looks up paths by the variant a subscriber bought.
-
Navigate to Products in the side navigation menu, then select All Products.
-
Click the Create Product button.
-
In the Create Product dialog, select Digital under What are you selling?, then enter the Product name.
-
Under How will customers pay?, select Subscription, then enter the Amount per payment and choose how often to Bill every (e.g.,
1Month). -
Click Create Product. The product opens on its Details tab.
-
Click the Variations tab. In the Options card:
-
Click Add option, then in Option name, enter a name for the option, such as
Tier. -
In the Add value field, type each plan name, such as
Essential Plan,Growth Plan, andElite Plan, pressing Enter after each one. Each value appears as a chip. -
Check the Review before saving summary. It lists the variants that will be created, and notes that new variants use the default product settings and are visible.
-
Click Save Options. The new plans appear in the Variants table.
-
Configuring Each Variant
Section titled “Configuring Each Variant”Give each plan its own subscription price, then connect the plans on the Pricing tab.
-
For each variant, set its price:
-
In the Variants table on the Variations tab, click the variant’s name to open its drawer.
-
In the Pricing section, click Set variant pricing. Variant pricing replaces all default prices for this variant — it doesn’t add to them.
-
In the Add price drawer, select Subscription as the Payment type, set the Amount per payment for this plan (e.g., $29), and choose how often to charge under Charge customers every (e.g., monthly).
-
Click Save Price.
-
For more detailed guidance on configuring pricing, refer to the How to Add and Manage Pricing article.
-
-
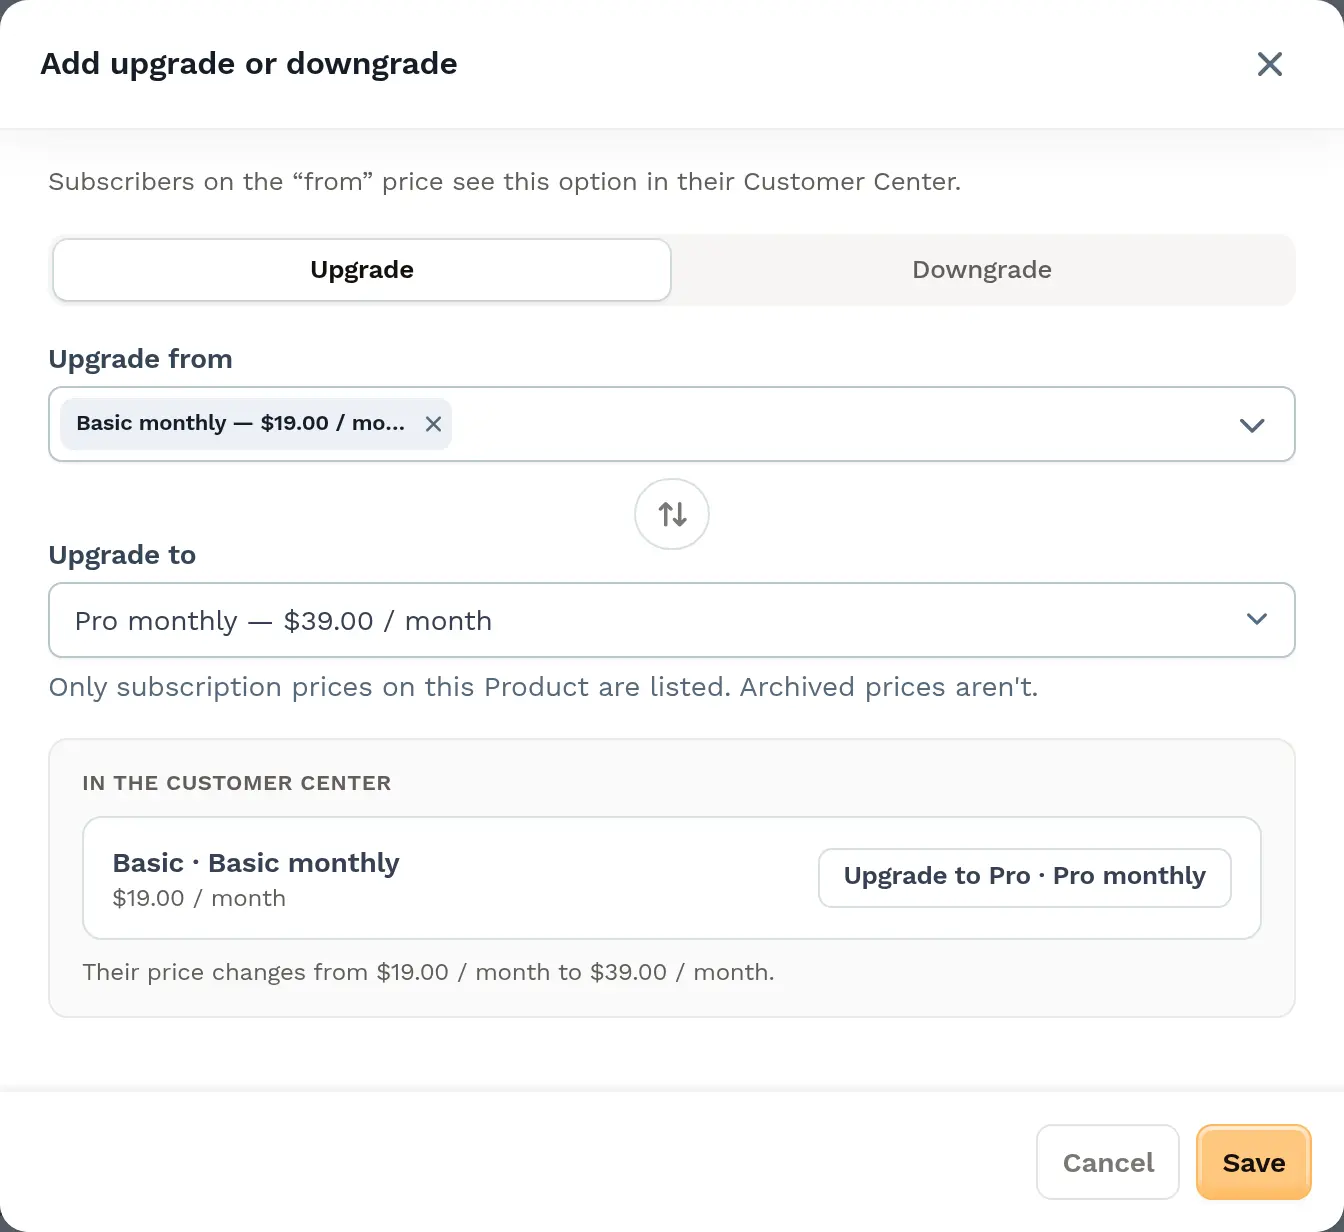
Click the Pricing tab and scroll to the Upgrades & downgrades card, then click Add upgrade or downgrade. The card appears once a variant has a subscription price — its own, or the product’s shared prices.
-
At the top of the dialog, select Upgrade or Downgrade.
-
For example, let’s configure an Upgrade for the
Essential Plan:-
Select Upgrade.
-
Under Upgrade from, choose the
Essential Planprice (e.g., $29/month). A new path can start from several prices at once; ClickFunnels makes one path per price. -
Under Upgrade to, choose the
Growth Planprice. Only subscription prices on this product are listed, and archived prices aren’t.
-
-
If the price you chose costs less per month than the one you’re switching from (or more, for a downgrade), the dialog suggests changing the direction, with a Make it a downgrade or Make it an upgrade button.
-
If either price has a trial, or the new price has a setup fee, a Review how subscribers who switch are billed. box explains how the change will be handled. For example: “If a user upgrades during the trial period, their trial will immediately end” or “A setup fee will not be charged when a user upgrades.”
-
The In the Customer Center preview shows what subscribers on the “from” price will see, such as an Upgrade to Growth Plan button.
-
Click Save to add the path. It’s listed in the Upgrades & downgrades card.
-
-
Repeat these steps for all the plans:
-
For the
Growth Plan, configure both an upgrade to theElite Planand a downgrade to theEssential Plan. -
For the
Elite Plan, configure a downgrade to theGrowth Plan. -
Double-check that all pricing and plan changes are accurate to avoid any confusion for your customers.
-
To change a path, click its pencil (Edit upgrade or Edit downgrade) icon in the Upgrades & downgrades card. To delete one, click its trash (Remove upgrade or Remove downgrade) icon and confirm. Subscribers who already switched stay on their current price.
Adding Products to a Funnel
Section titled “Adding Products to a Funnel”After configuring your subscription products with upgrade and downgrade options, the next step is to attach them to a funnel. Follow these steps to integrate your product into a funnel and enable the upgrade/downgrade functionality:
-
Navigate to Funnels in the side navigation menu.
-
Select the funnel you want to attach the product to and open it in the funnel workflow editor.
-
Locate the page where you want to add the product (e.g., the checkout page), and click the three dots next to the page name.
- Ensure this page includes a Checkout element to support product purchases. To learn more about the Checkout element, refer to the Checkout: Enable Users to Complete their Purchase article.
-
Click Add Products from the dropdown menu.

-
Click the Add product button to open a window displaying a list of all existing products.
-
Hover over the desired product and click Select Product.
-
Once the product is added, click the gear ⚙️ icon next to your product.
-
Click on Availability and Prices and ensure all your configured prices are selected and visible. The checkout offers a customer an upgrade or downgrade only when the plan they’re moving to (its variant and price) is included on that page.
-
Finally, click Update included product to save your changes and apply the settings.
Testing the Setup
Section titled “Testing the Setup”After integrating your subscription product into a funnel, it’s important to test the setup to ensure everything is functioning as expected.
-
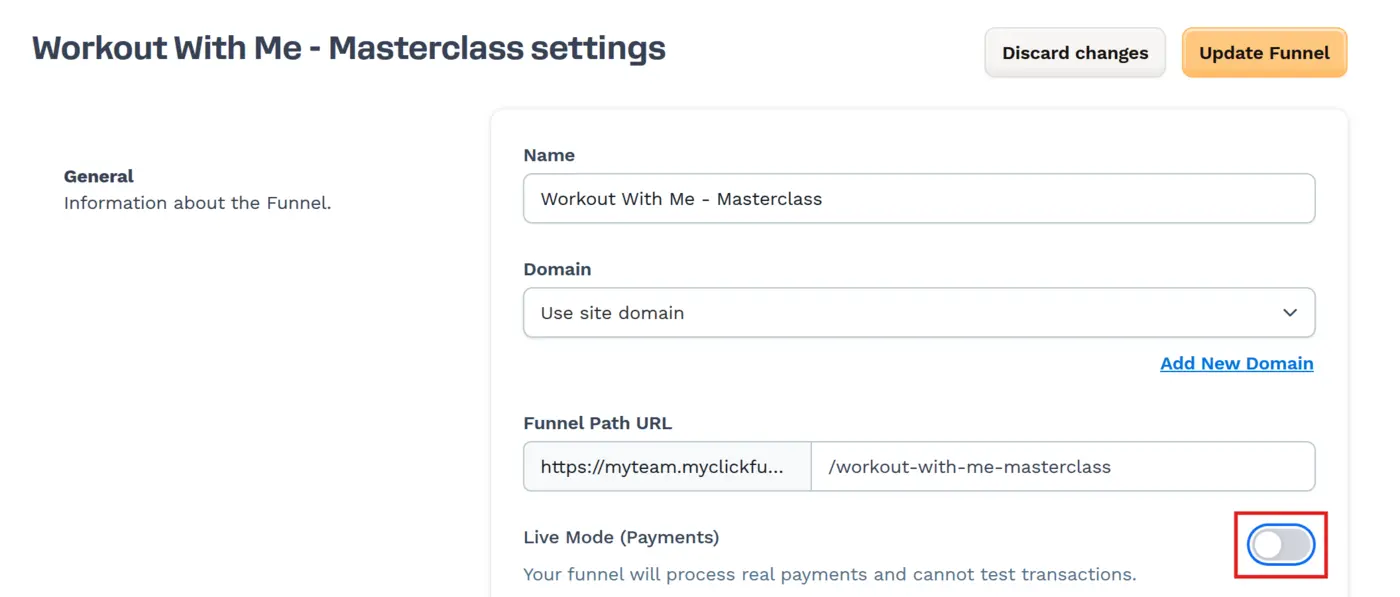
In Funnel Settings, turn off Live Mode (Payments) so you can test without real purchases.
-
Copy the funnel URL from the top center of the funnel workflow editor and open it in a new browser tab. Navigate through the funnel until you reach the checkout page.
-
Use a test email address to simulate a purchase. Select one of your configured subscription plans and proceed through the checkout process using the following test credit card details:
-
Card Number:
4111-1111-1111-1111 -
CVV: Any 3-digit number
-
Expiry Date: Any future date
-
-
Complete the purchase and confirm that you’re redirected to the appropriate confirmation page. Verify that the receipt or order summary accurately reflects the selected subscription plan.
-
Return to the funnel URL and enter the same test email address used during the initial purchase. The Checkout element should recognize you as an existing customer and offer options to upgrade or downgrade your subscription.
-
Select a new plan to test the upgrade or downgrade functionality. In the Manage Subscriptions section, use the dropdown under your active order to choose a new plan (e.g., upgrade to
Elite Planor downgrade toEssential Plan). Click Update My Order! to complete the process.
Why aren’t upgrades or downgrades showing on the checkout page?
The checkout shows only the upgrades and downgrades configured in the product’s Upgrades & downgrades card on the Pricing tab, and only when the plan the customer would move to (its variant and price) is included on that checkout page. Check the Upgrades & downgrades card, then open the product’s settings in your funnel, click Availability and Prices, and make sure the target prices are selected. Save the changes and test again.
Why are the prices for my variants missing or incorrect?
If your prices aren’t showing up correctly, it’s likely because the variant prices weren’t set for your variants or because the prices weren’t selected in the funnel’s Availability and Prices section. Make sure each variant has its own price: on the product’s Variations tab, open the variant and check its Pricing section, or check the Variant pricing table on the Pricing tab. Then, go to the funnel settings, click Availability and Prices, and confirm all necessary prices are selected.
Why doesn’t Test Mode recognize an existing customer?
Test Mode won’t recognize a customer if the email used during the test doesn’t match the one used for the initial purchase. Make sure to use the same test email address for both the first purchase and the upgrade or downgrade test. Also, confirm that Live Mode (Payments) is turned off in the funnel settings.
Why aren’t plan upgrades or downgrades applying correctly?
This issue typically happens when the upgrade or downgrade paths haven’t been configured properly. Check the Upgrades & downgrades card on the product’s Pricing tab and make sure the correct plans are selected for upgrades and downgrades.