
(Collections) Products: Showcase Products on Your Page
Published: Updated:
The challenge of showcasing multiple products neatly on a page can quickly become complex, especially when managing a growing inventory. ClickFunnels simplifies this with the Products collection element, a dynamic grid container designed to display all your available products in one place. In this article, you will learn how the Products collection element dynamically displays the products from your workspace.

Requirements
Section titled “Requirements”-
An active ClickFunnels account
-
At least one product created in your workspace
-
For the store’s storefront pages: the Store switch turned on in the product’s Sales channels tab
-
Products added to the funnel page (when used in a funnel page)
Understanding the Collections Elements
Section titled “Understanding the Collections Elements”Imagine you’re organizing a photo album. The album is the Collection Element, which is a container that holds and displays individual photos. Each photo in the album represents an item in the collection, such as a product, blog post, or lesson.
Now, think about how the album is arranged:
-
Photos are displayed in rows and columns on each page (just like the grid layout in a Collections element). For example, you might have 3 photos per row and 4 rows on a page.
-
If the album has more photos than can fit on one page, you add page numbers to flip through the additional pages, similar to how pagination works for larger collections in ClickFunnels.
A Collection element in ClickFunnels is a container designed to display collections of content dynamically. A collection consists of grouped items such as products, blog posts, course modules, lessons, and more. Adding a Collection element to your page lets you showcase these items in an organized and visually engaging way. Each container allows you to insert dynamic content elements, such as product names, descriptions, images, prices, or links, to represent the associated data within the collection.

Behind the scenes, a Collection element uses the CSS grid layout (via the display: grid property) to organize its contents. This layout divides the container into rows and columns, ensuring all items are evenly spaced and aligned. The grid layout’s structure makes it highly adaptable, automatically adjusting the arrangement of items based on the number of elements, the number of columns specified, and the available screen size.
For example:
-
When visitors browse your store, you can use the Products collection element to display all your products with key details like name, price, and description.
-
The Blog Posts collection element allows you to showcase recent or featured blog posts from your blog.
-
The Lessons collection element is ideal for displaying all lessons within a module template page, while the Modules collection element can list all course modules on the Course home page.
Adding the Products Collection Element in the Editor
Section titled “Adding the Products Collection Element in the Editor”-
Inside the page editor, add a Section where you want to place the element.
-
Add a Row within that section.
-
Alternatively, insert a Flex container instead of a section and row.
-
Click the orange + Plus or Add New Element button inside the row to insert a new element.
-
From the Collections category, select the Products element.
-
Once inserted, configure the number of items displayed per row. By default, the element displays three items per row. You can change this setting to adjust the layout. For example, setting “Items Per Row” to 4 and “Items per page” to 8 shows two rows of four products.

-
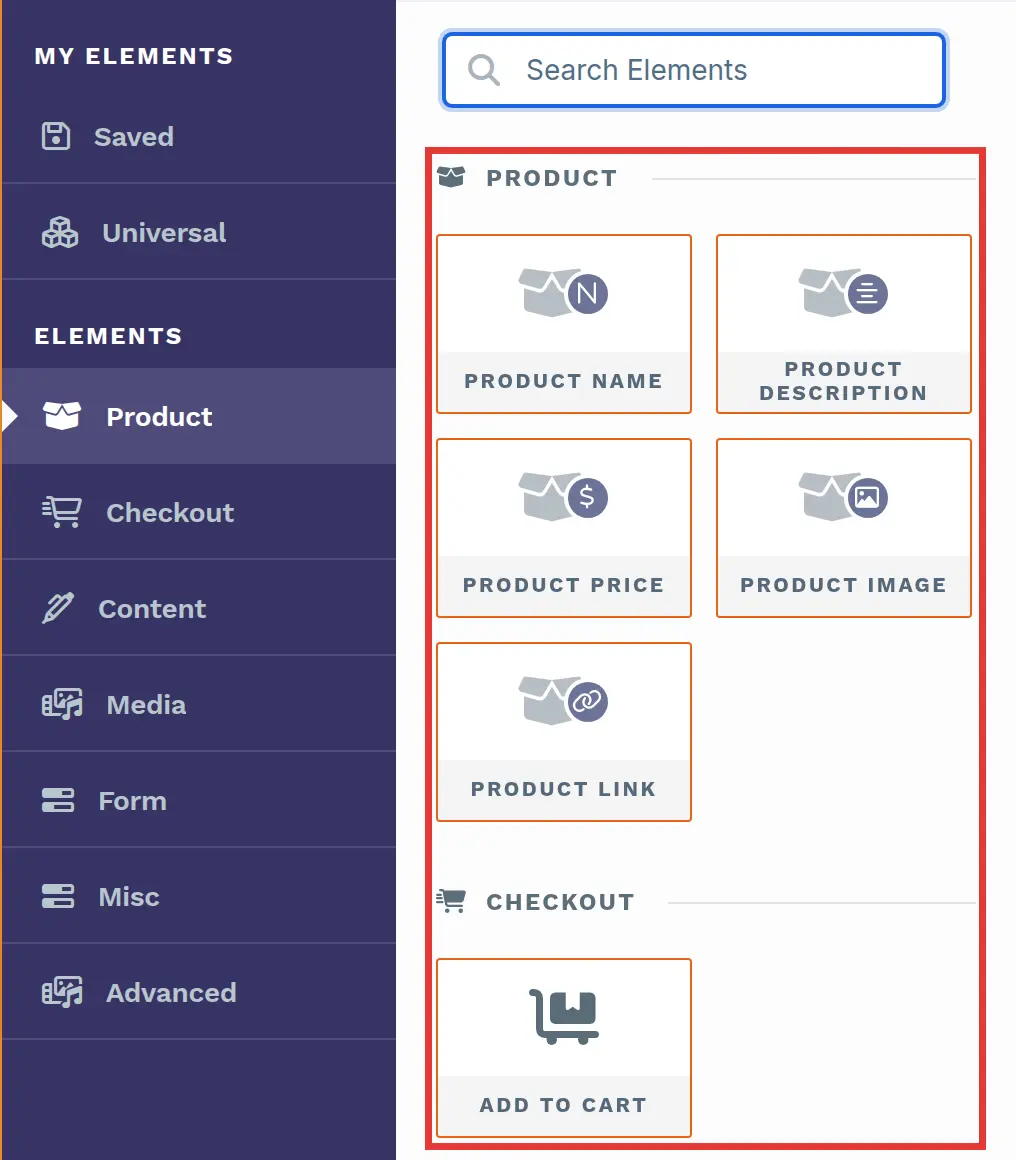
Inside each grid of the Collection element, insert associated content elements. For example, for a “Products” collection element, you can insert Product name, Product description, Product price, Product image, Product link, and Add To Cart elements specially designed to populate data in the “Products” collection element dynamically. Add To Cart can’t be added on funnel pages.
-
Once associated elements are added, they will be replicated across all grid columns. The liquid syntax within these elements dynamically pulls data from the products, ensuring each item is unique. Which products appear depends on the type of page; see Which Products Appear.

Which Products Appear
Section titled “Which Products Appear”The products the Products element lists depend on the page it’s on:
-
Product page: Only the product the page is for. If you turn on Filter By Collection, it lists the products in the selected collections instead, leaving out the product the page is for.
-
Funnel page: The products added to that funnel step.
-
Store pages: Products that are visible in your online store and available for sale.
-
Product collection page: The collection’s products that aren’t archived. Products shown only in the Customer Center are left out.
-
Store upsell page: The products in the upsell’s collection, if the upsell uses a collection. Otherwise, the element shows no products.
-
Customer Center: Products that are visible in the Customer Center and available for sale.
-
Any other page: All products that aren’t archived, except products shown only in the Customer Center.
Filters on the element, such as Filter by bump and Filter By Collection, then narrow this list.
Adding Dynamic Elements in the Grid
Section titled “Adding Dynamic Elements in the Grid”When you add the Products collection element to a page, you’ll fill each grid card with smaller collection-aware elements. When your cursor is inside a grid and you open the elements panel, ClickFunnels highlights the compatible Product elements with an orange border to show they’ll work dynamically inside the collection. These elements automatically pull data from the product represented by that grid; no manual data entry is required.

How dynamic content appears
Section titled “How dynamic content appears”When you drop a Product element into a grid, the editor shows a placeholder such as {{product.name}} or {{product.display_price}}. These are Liquid placeholders. On your live page, ClickFunnels replaces them with the real product data from your workspace.
Elements you can add inside each grid item
Section titled “Elements you can add inside each grid item”-
Product name
What it shows: The product’s name from your product settings.
Placeholder:{{product.name}} -
Product description
What it shows: The product description you saved in the product settings.
Placeholder:{{product.description}} -
Product price
What it shows: The product’s price as configured in your store.
Placeholder: Commonly appears as{{product.display_price}}. -
Product image
What it shows: The product image stored in your product settings.
Placeholder: Image -
Product link
What it does: Adds a dynamic text link that points to the grid item product page.
Placeholder: View Details -
Add To Cart (Checkout → Add To Cart)
What it does: Adds the specific product in that grid item to the shopper’s cart. Not available on funnel pages.
Customizing the Products Collection Element
Section titled “Customizing the Products Collection Element”When you hover over a collection element, its border will be highlighted in magenta. To access its settings, click on the g****ear ⚙️ icon or click directly on the element.

Top Margin
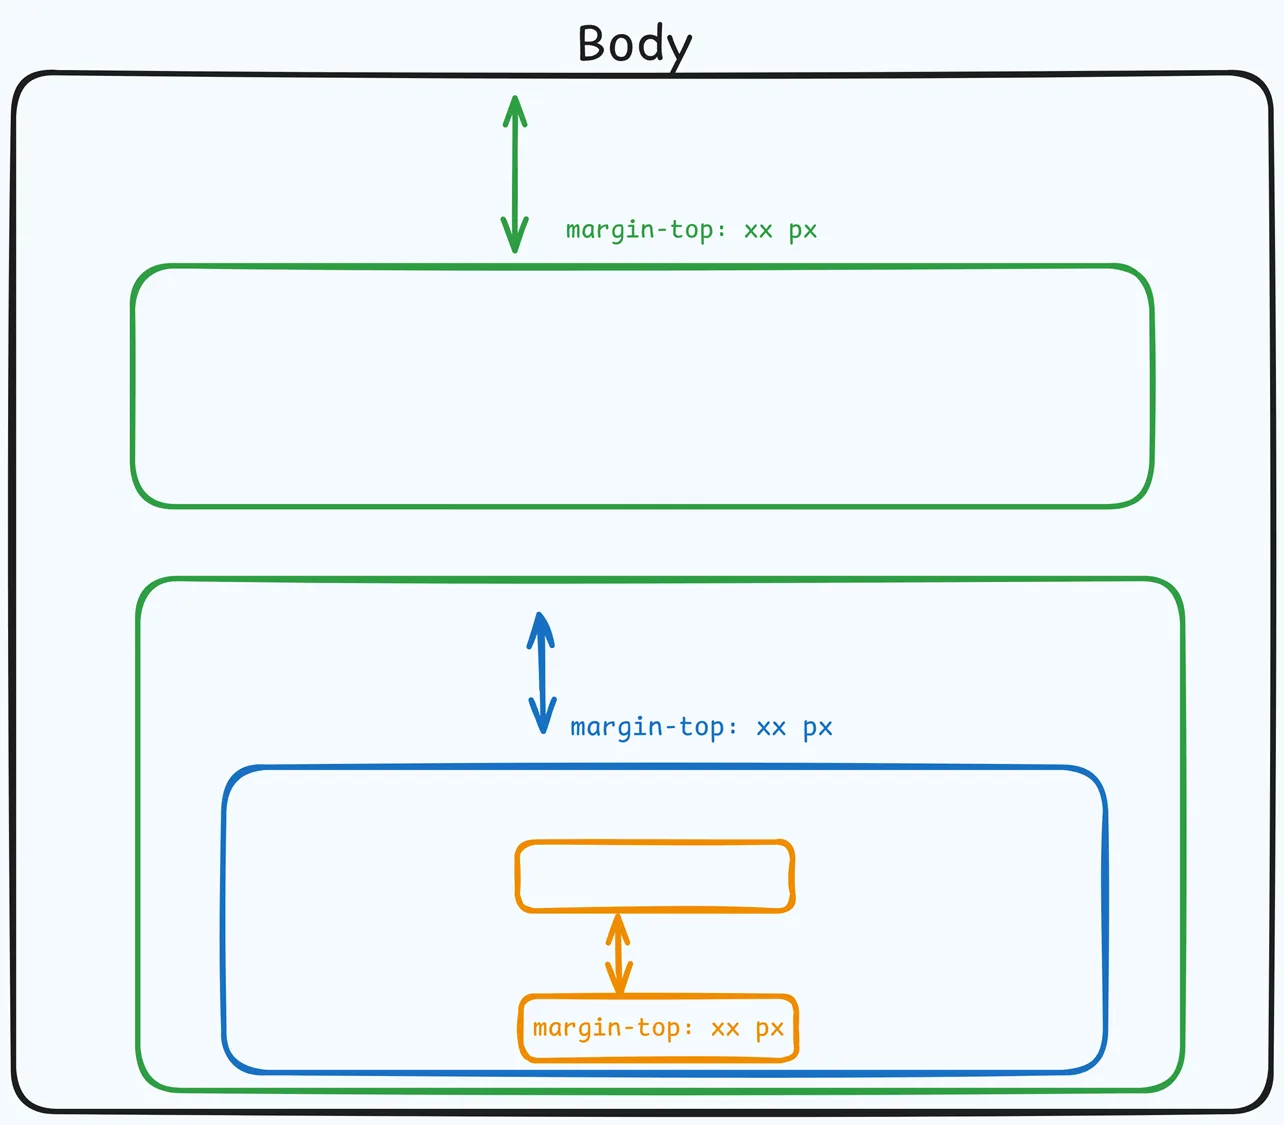
 The Top Margin setting lets you control the space between the current container (section, row, flex, and element) and the container directly above it. If no previous container exists, the margin will be applied relative to the parent container. If no preceding container is added, the Body will be the parent.
You can set top margin values independently for desktop and mobile by using the device icons (🖥️ & 📱 ). If no mobile value is specified, it will inherit the desktop setting by default. Use the slider or manually enter a value in pixels (px) or percentage (%) to create consistent spacing across screen sizes.
Filters

The Filters settings allow you to control which products are displayed:
-
Filter by bump: This option works when the Products collection element is used on a funnel page and products have been added to that page. It lets you display only bump products, only non‑bump products, or all products that were added to the funnel page.
-
Display All: Shows all products, including both bump and non-bump products, added to the funnel page.
-
Show Only Bump Products: Displays only products marked as bump products to the funnel page.
-
Show Non Bump Products: Displays only products not marked as bump products to the funnel page.
-
-
Filter By Collection: Show only items from a specific product collection, a group of related products you manage in your store (e.g., “New Arrivals,” “Accessories,” etc.). Check Filter By Collection, then choose an option from the list. Choose Current Collection when the page already has a collection context (like a collection template); the grid updates automatically as visitors switch collections. Or select one of your collections to lock the grid to that collection. On product pages, the first option in the list is Select a Collection instead of Current Collection.
Collection Settings
 The Collection Settings let you configure how grid items (cards) are arranged and paginated inside the container.
-
Items Per Row: Choose how many items appear on each row of the grid. The layout will wrap to new rows and adapt on smaller screens automatically.
-
Items per page: Set the total number of items rendered on a single page in the container. If the collection has more than this number, ClickFunnels creates additional pages.
-
Hide pagination: Hides the page numbers below the collection. The collection still shows only the number of items set in Items per page, so visitors can’t reach items beyond the first page. To show every item without page numbers, set Items per page high enough to include all of them (up to 100), then turn on Hide pagination.
-
Pagination Item Color: Color of the pagination items’ text/icons (e.g., the numbers 1, 2, 3).
-
Pagination Item Background Color: Background color for non‑active pagination items.
-
Pagination border color: Border color around each pagination item.
-
Pagination Active Item Color: Text/icon color for the current (active) page item.
-
Pagination Active Item Background Color: Background color for the active page item.
-
Pagination Active Border Color: Border color for the active page item.
Advanced Settings
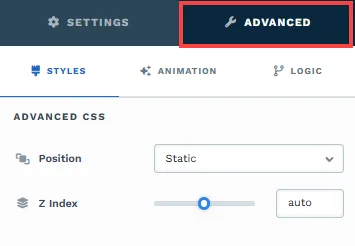
To further customize your container (section, row, column, and element), ClickFunnels provides Advanced settings that allow you to control style, advanced CSS, animation, and rendering logic. We’ve separated these advanced features into dedicated articles to avoid overwhelming you with too much content in one place and to keep our documentation concise. Explore the following resources for more details:
-
Advanced Settings - Customize Styles: Learn how to populate contents dynamically, position containers, and apply z-index.
-
Advanced Settings - Customize Animation: Learn how to add animations, control entry and exit effects, and adjust animation delay.
-
Advanced Settings - Customize Logic: Learn how to apply conditional logic to elements and add custom attributes.
Control Panel
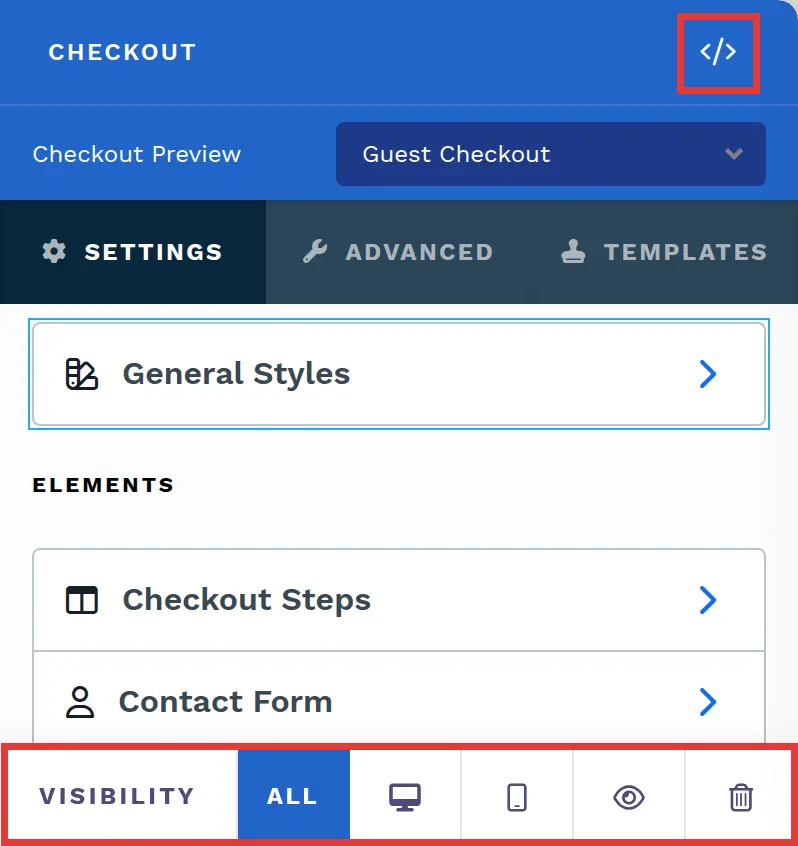
The Control Panel appears at the bottom of every container(Section, Row, Flex, and Element) in the page editor, offering quick access to essential settings and actions for that container. Here’s what each icon represents:
-
ALL: The container will be visible on all devices (desktop, tablet, and mobile).
-
Desktop (🖥️**) Icon**: The container will only be visible in desktop view.
-
Mobile (📱) Icon: The container will only be visible in mobile view.
-
Eye (👁️) Icon: Use this to hide the container from the page. Once clicked, the container will be hidden in the editor but not deleted. You can click the Layout menu in the top navigation bar to find the hidden containers. Select All, Desktop, or Mobile icon to unhide in the editor.
-
Code (
</>): Opens the code editor for this container, where you can add custom CSS to change its styling. The editor shows the container’s CSS ID Selector so your CSS targets only this container. Open it from the code icon at the top of the settings panel, or hover over the container on the page and click Code in its toolbar. -
Trash (🗑️**) Icon**: Removes the container from the page editor entirely.