
Turn a Button Into a File Download
Published: Updated:
The Download File… button action lets a button hand a file straight to your visitors. Choose a file from your workspace Downloads library — or upload a new one without leaving the editor — and the button will either download that file or open it in a new browser tab when a visitor clicks it. This removes the need to host a lead magnet, PDF, or resource somewhere else, copy its URL, and paste that URL into a button. In this article, you will learn how to attach a file to a button and how to control what happens when the button is clicked.
Requirements
Section titled “Requirements”-
An active ClickFunnels account
-
A page created in your workspace
-
The file you want to deliver (you can upload it while setting up the button)
Attaching a File to a Button
Section titled “Attaching a File to a Button”-
In the page editor, add a Button element, or click an existing button to open its settings panel. To add a new one, click the orange + Plus or Add New Element button inside a row and select Button from the Form category.
-
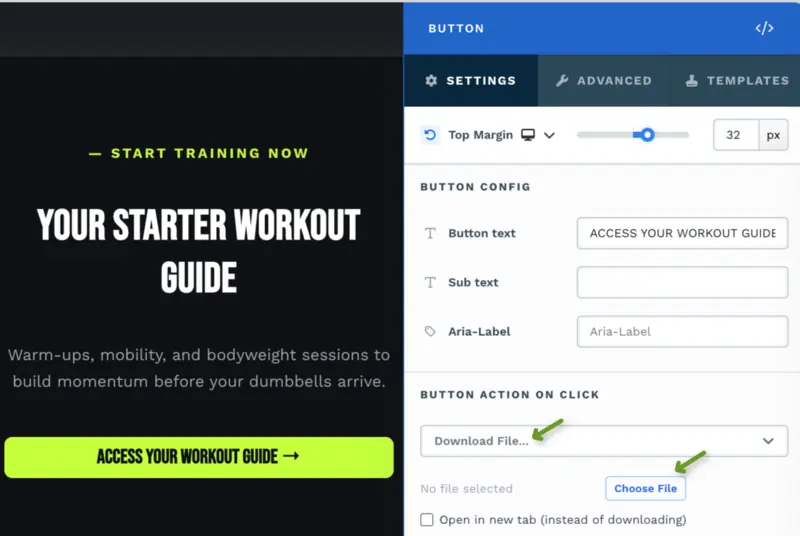
In the settings panel, scroll to the Button Action section.
-
Open the action dropdown and select Download File…. It is the last option in the list.
-
A small panel appears below the dropdown showing No file selected and a Choose File button.
-
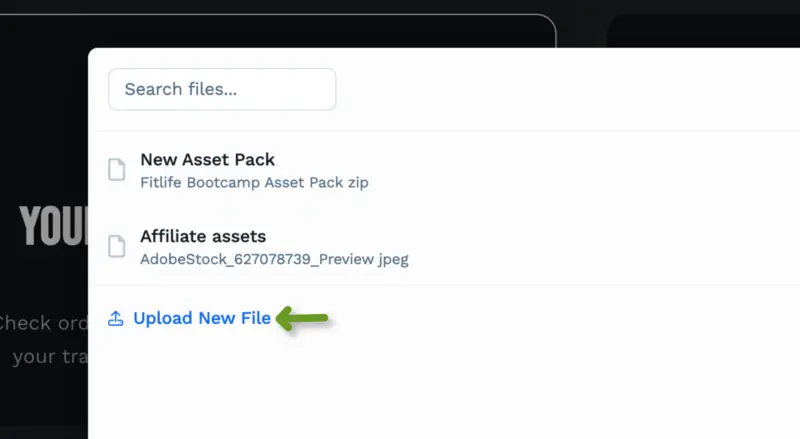
Click Choose File to open the Select File dialog.
-
Pick the file you want to deliver:
-
Select an existing file: Type in the Search files… field to filter your workspace’s Downloads by name, then click the file you want. Each row shows the file’s name with its original filename beneath it. The list filters as you type, and shows No files found if nothing matches.
-
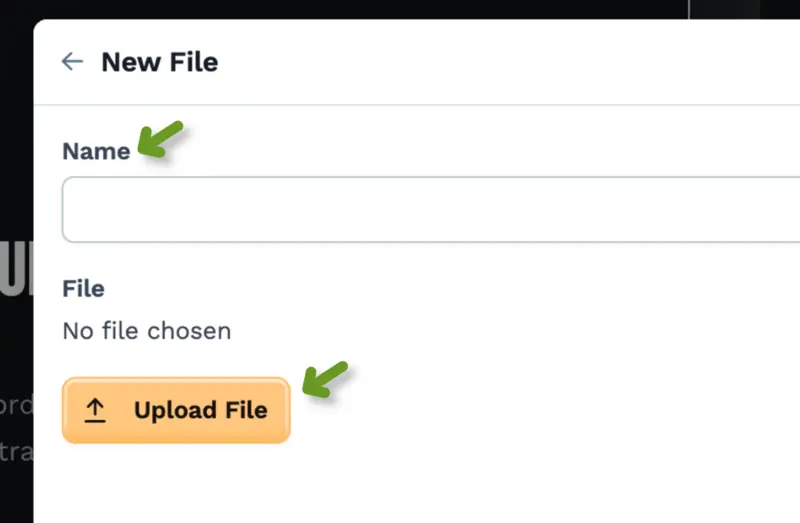
Upload a new file: Click Upload New File at the bottom of the dialog. Enter a Name, click Upload File to choose the file from your device, then click Create File. Use the back arrow (←) next to the New File heading if you want to return to the file list instead.
-
-
The dialog closes as soon as you select or finish uploading a file, and the file’s name appears in the button settings. A newly uploaded file is selected automatically — there is no separate selection step.
-
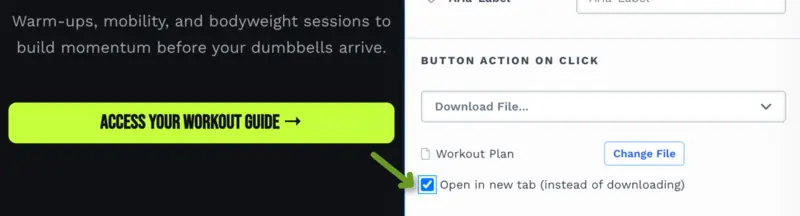
Decide what should happen when a visitor clicks the button using the Open in new tab (instead of downloading) checkbox:
-
Leave it unchecked (the default) to force a download. The visitor clicks the button and the file saves to their device in the same tab — no new tab, no detour.
-
Check it to open the file in a new browser tab instead. The file is displayed rather than downloaded, so a PDF opens in the browser’s PDF viewer and an image is shown on screen. This is useful when you want visitors to read something immediately without saving it first.
-
-
Save the page, then Publish it so the live page serves the file.
Changing or Replacing the File
Section titled “Changing or Replacing the File”Once a file is attached, the button settings show the file’s name and the Choose File button becomes Change File.
-
Click Change File to reopen the Select File dialog.
-
Search for and select a different file, or upload a new one.
-
The new file replaces the previous one and keeps your current download or open-in-new-tab setting.
-
Save and Publish the page to apply the change.
Where These Files Live
Section titled “Where These Files Live”Files offered in the Select File dialog are the same files listed under Workspace Settings » My Assets » Downloads. Anything you upload through the dialog is added to that library, so you can reuse it on other buttons, attach it to products, or send it through a workflow later.
For supported file types, size limits, and the other ways to deliver a file to your audience, refer to the article Delivering Digital Downloads.
Common Use Cases
Section titled “Common Use Cases”-
Lead magnet delivery: Put a Download File… button on the thank-you page of a lead magnet funnel so new subscribers get the PDF immediately after opting in.
-
Bonus and resource pages: Give customers a single page of downloadable worksheets, templates, or checklists, each on its own button.
-
Preview documents: Enable Open in new tab (instead of downloading) for a sample chapter or price sheet you want visitors to read on the spot.
To review every action a button can perform, refer to the article Setting Up Actions for Buttons, Text, and Images in ClickFunnels.