How to Personalize Emails with Merge Tags in ClickFunnels
Published: Updated:
When sending emails to a large audience, creating a personal experience for each contact can be time-consuming and inefficient if done manually. To address this, ClickFunnels offers Merge Tags—a feature that allows you to automatically insert each recipient’s personal details, such as their name or email address, directly into your emails. In this article, you will learn how to use merge tags in ClickFunnels emails to personalize subject lines and content.
Requirements
Section titled “Requirements”-
An active ClickFunnels account
-
An email created in the Broadcast or Workflow
What Are Merge Tags
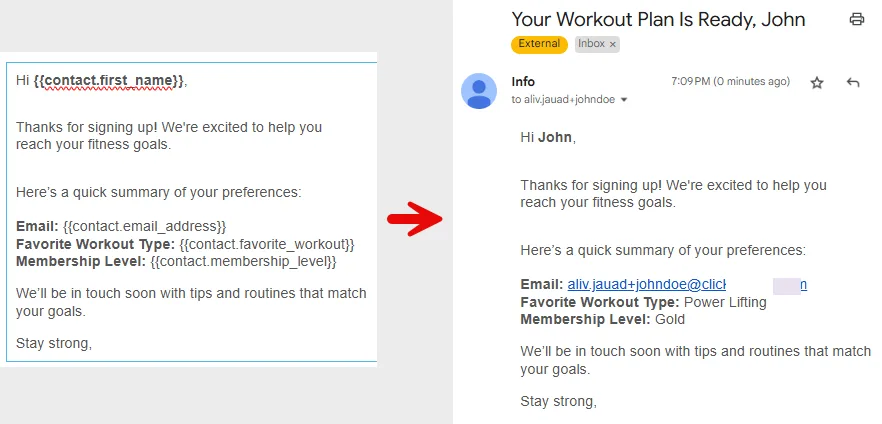
Section titled “What Are Merge Tags”Merge tags are dynamic placeholders used to personalize email messages. When an email is sent, these placeholders are replaced with real contact data, making each email feel individually written—even when it’s part of a bulk send.
They are called “merge tags” because they merge stored contact information into predefined locations within your email. This automatic merging process ensures each recipient sees content that feels tailored to them.
Examples:
Section titled “Examples:”-
Without merge tags:
Hello, -
With merge tags:
Hello {{contact.first_name}},→ displays as “Hello John” when sent
Other examples include:
-
Dear {{contact.last_name}},→ “Dear Smith,” -
Your email: {{contact.email_address}}→ “Your email: john@example.com” -
We may contact you at {{contact.phone_number}}→ “We may contact you at 123-456-7890”
Merge tags enhance personalization and can lead to higher engagement rates in your email campaigns.
Where Can I Use Merge Tags
Section titled “Where Can I Use Merge Tags”Merge tags can be used in the following areas within ClickFunnels:
-
Broadcast Emails – sent to a list of contacts manually or on a schedule
-
Workflow “Send Email” Steps – automated emails triggered by workflow actions
You can insert merge tags in both:
-
The Subject Line
-
The Email Body Content
This allows you to personalize not just the content but also the first thing a contact sees in their inbox.
Accessing Merge Tags
Section titled “Accessing Merge Tags”Merge tags can be added to both the subject line and the email body content. Here’s how to use them in each area:
1. In the Email Subject Line
Section titled “1. In the Email Subject Line”-
Access the email from either a Broadcast or a Workflow.
-
Locate the Subject Line field.
-
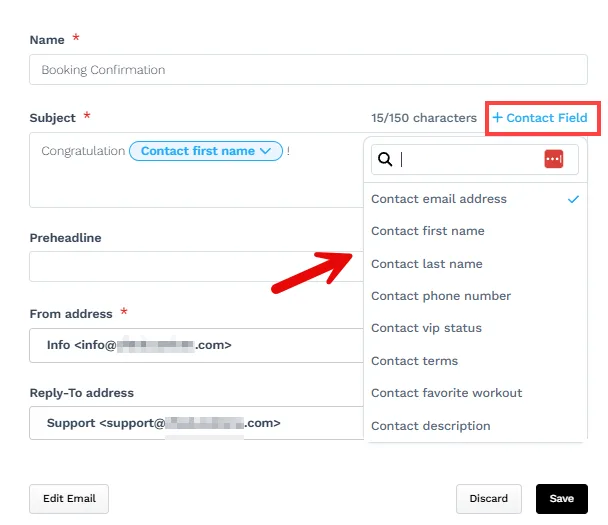
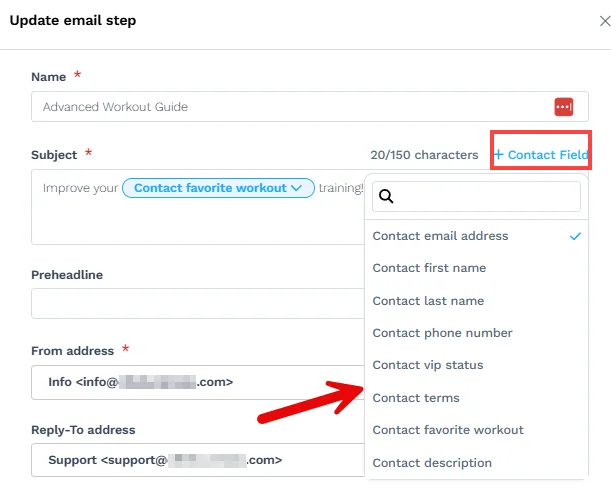
Click the “Merge Tags” or “+ Contact Field” link next to the subject line input field.
-
Select the tag you want to insert. Once added, It will appear in the format
{{contact.XX_YY}}and automatically replace the actual contact value when the email is sent.
2. In the Email Body Content (Email Editor)
Section titled “2. In the Email Body Content (Email Editor)”-
Access the email from either a Broadcast or a Workflow.
-
Edit the Email.
-
Click inside a text block such as Title, Paragraph, List, Button, or Text.
-
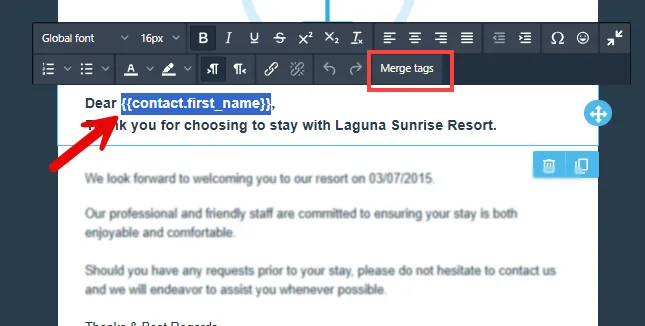
In the editing toolbar, click the Merge Tags button.
-
In the pop-up window, choose the desired tag. You can also use the search bar to locate it quickly. Once added, It will appear in the format
{{contact.XX_YY}}and automatically replace the actual contact value when the email is sent.
Available Merge Tags
Section titled “Available Merge Tags”Standard Merge Tags
Section titled “Standard Merge Tags”Standard Merge Tags can be utilized in any email within your ClickFunnels workspace, including Broadcast Emails, Workflows, and System Emails.
| Name | Merge Tag | Description |
|---|---|---|
| Contact First Name | {{contact.first_name}} |
Inserts the contact’s first name |
| Contact Last Name | {{contact.last_name}} |
Inserts the contact’s last name |
| Contact Email Address | {{contact.email_address}} |
Inserts the contact’s email address |
| Contact Phone Number | {{contact.phone_number}} |
Inserts the contact’s phone number |
Custom Merge Tags
Section titled “Custom Merge Tags”Custom merge tags allow you to include additional contact-specific data collected through forms on your funnels or landing pages. These fields can be anything you define, such as a customer’s company name, membership type, or preferred session time.
Example Scenario: Suppose you’re hosting a fitness webinar and ask registrants to select their “Favorite Workout Type” in a form. In your workspace settings, you create a custom contact attribute called favorite_workout. Once submitted, this value is stored for each contact.
When creating your follow-up email, you’ll see a merge tag {{contact.favorite_workout}} available in the dropdown. When the email is sent, this tag will be replaced with the contact’s response, such as “Strength Training” or “Yoga.”
Custom merge tags will appear in the merge tag dropdown menu when editing an email subject line or body.
Special Merge Tags (for System Emails)
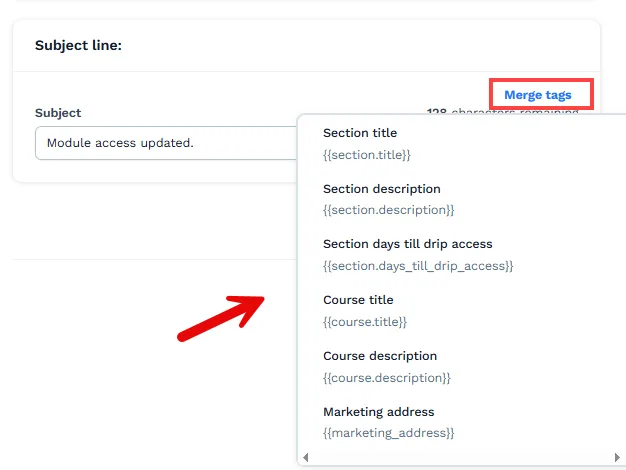
Section titled “Special Merge Tags (for System Emails)”System emails are sent automatically when a specific platform event occurs—such as course registration, order confirmation, appointment confirmation, affiliate approval, etc. Each system email type includes a unique set of merge tags relevant to its purpose. You can view the relevant merge tags directly within each system email subject line and in the email editor.
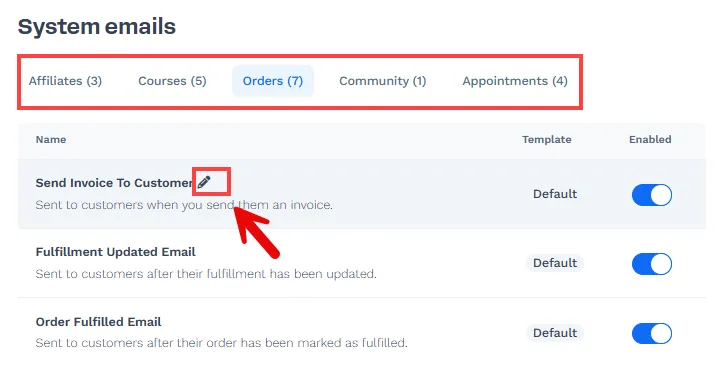
Here’s how to locate the relevant merge tags for system emails:
-
Go to Workspace Settings in the left-hand menu.
-
Click System Emails.
-
Access the system email you wish to edit.
-
Click the Merge Tags link beside the Subject Line field or in the Email Editor.
-
A dropdown will appear with the merge tags specific to that email type.