
ClickFunnels MCP Server Beta
Published: Updated:
Overview
Section titled “Overview”The ClickFunnels MCP Server connects an AI assistant — like Claude or ChatGPT — directly to your ClickFunnels workspace. Using the Model Context Protocol (MCP), your assistant can look up your workspace data and take action on your behalf through plain conversation, backed by the same functionality that’s available in the ClickFunnels app.
Once connected, you can ask your AI assistant to:
-
Build and manage funnels, including funnel pages and steps
-
Manage contacts and CRM tags
-
Manage products and stores, including checkout setup
-
Create and manage courses and course content
-
Manage sites and blog content
-
Track marketing opportunities and deals
The new MCP Server and the legacy connector
Section titled “The new MCP Server and the legacy connector”There are currently two ClickFunnels MCP connectors:
-
The new MCP Server at
https://agents.myclickfunnels.com/mcp. This is the one to use going forward. It replaces the legacy connector and offers expanded functionality, and you connect it with your own ClickFunnels login. -
The legacy MCP Server, described in earlier versions of this article. It still works, and we are not breaking it. If you already have it connected, you don’t need to do anything — it will keep functioning until it is eventually sunset, and we’ll communicate separately before that happens.
One thing to know: having the legacy connector connected does not give you the new tools. If you want the new functionality, disconnect the legacy ClickFunnels MCP connector in your AI client, then connect the new one using the steps below.
Requirements
Section titled “Requirements”Before you begin, make sure you have:
-
An active ClickFunnels account with a login you can authorize with
-
An MCP-compatible AI client that supports remote MCP servers over HTTP with OAuth — for example Claude (Desktop or web), ChatGPT, or a generic MCP client such as n8n or Manus
How to Connect
Section titled “How to Connect”Connecting has changed. Instead of the old workspace-linked setup, you now authorize the MCP Server with your own individual ClickFunnels login through OAuth — the same style of authorization flow you’d use when connecting ClickFunnels to Zapier, Make, or n8n. The connection is tied to the user who authorizes it, not shared at the workspace level.
The exact steps vary slightly depending on which AI client you use, but the flow is the same everywhere.
Step 1: Open your AI client’s connector settings
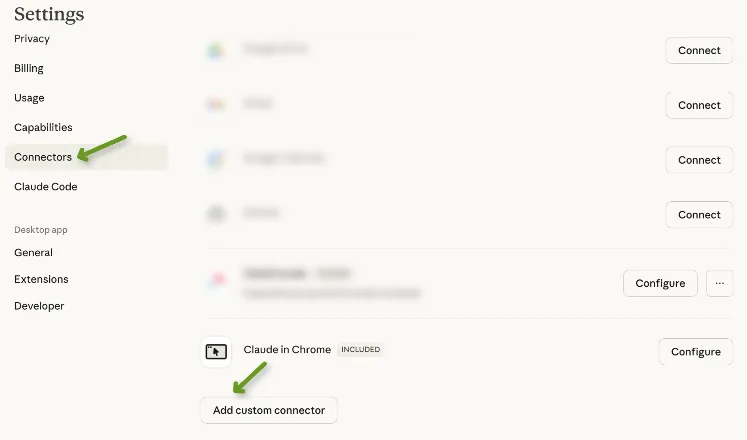
Section titled “Step 1: Open your AI client’s connector settings”In your AI client, find the settings screen for connectors (sometimes called integrations, apps, or tools), and choose the option to add a custom connector.
Step 2: Add ClickFunnels as a custom connector
Section titled “Step 2: Add ClickFunnels as a custom connector”Enter the following details:
| Field | Value |
|---|---|
| Connector Name | ClickFunnels |
| Connector URL | https://agents.myclickfunnels.com/mcp |
Then save or add the connector.
Step 3: Authorize with your ClickFunnels login
Section titled “Step 3: Authorize with your ClickFunnels login”Your AI client will open a ClickFunnels sign-in window. Log in with your own ClickFunnels credentials and approve the connection.
Because the connection is tied to the account you sign in with, the assistant can work with the same data your login already has access to in ClickFunnels.
Step 4: Choose your permission level
Section titled “Step 4: Choose your permission level”During setup, you’ll be asked to choose how much access to grant:
-
Read-only — the assistant can look up and report on your workspace data, but can’t change anything.
-
Full read and write — the assistant can also create, update, and manage things on your behalf.
Pick the level that matches how much you trust the AI client to take action for you. Read-only is a good place to start if you mainly want to ask questions about your workspace; full access is what you want if you’d like the assistant to build and edit things for you.
Once the connector is authorized, the ClickFunnels tools become available in your conversations.
Client-specific notes
Section titled “Client-specific notes”Claude (Desktop and web): open Settings, go to Connectors, and choose Add custom connector. Enter the connector URL above, then complete the ClickFunnels sign-in when prompted. Don’t have Claude Desktop? Download it from https://claude.ai/download.
ChatGPT: add ClickFunnels as a custom connector using the same URL, then complete the ClickFunnels sign-in when prompted.
Other MCP-compatible clients: any client that supports remote HTTP MCP servers with OAuth (for example n8n or Manus) can connect using the same URL and sign-in step. Refer to your client’s documentation for where custom MCP servers are configured.
What You Can Do with the MCP Server
Section titled “What You Can Do with the MCP Server”Here’s a closer look at what you can ask for once the connector is in place.
Funnels and funnel pages
Section titled “Funnels and funnel pages”Build and manage funnels conversationally — create a new funnel, add or reorder steps, and work on the individual pages inside it. This is handy when you know the structure you want and would rather describe it than click through it.
Contacts and CRM tags
Section titled “Contacts and CRM tags”Look up contacts, create and update them, and organize your audience with tags. You can ask the assistant to find a specific contact, tag a group of people, or tidy up the tags in your workspace.
Products and stores
Section titled “Products and stores”Create and update products, manage your store, and handle the setup around selling — including checkout configuration. Useful when you’re launching something new and want the pieces in place quickly.
Courses and course content
Section titled “Courses and course content”Plan and build courses with your assistant, from the overall structure down to modules and lessons, and manage the content inside them.
Sites and blog content
Section titled “Sites and blog content”Manage your sites and blog content, including creating and updating posts.
Opportunities and deals
Section titled “Opportunities and deals”Work with your marketing opportunities and deals so you can track and update your pipeline without leaving the conversation.
Anything the assistant does here is real activity in your workspace, so it shows up in ClickFunnels exactly as if you’d done it yourself.
Example Conversations
Section titled “Example Conversations”Here are some examples of how you might work with your AI assistant once the MCP Server is connected:
Building a funnel
Section titled “Building a funnel”You: “I’m launching a coaching program. Can you build me a funnel with an opt-in page, a sales page, and a thank you page?”
AI: “I’ll create that funnel and set up the three steps for you…”
Creating a course
Section titled “Creating a course”You: “I want to create a course about digital marketing. Can you help me plan the structure?”
AI: “I’d love to help! Let me create the course structure for you…”
AI: “✅ Course structure created! Digital Marketing Mastery with 4 modules and 16 lessons total.”
Organizing contacts
Section titled “Organizing contacts”You: “Find everyone who signed up for my webinar and tag them as Webinar Attendee.”
AI: “I’ll look up those contacts and apply the tag…”
Setting up a product
Section titled “Setting up a product”You: “Add a new product called Coaching Intensive at $499 and get checkout ready for it.”
AI: “I’ll create the product, add the price, and set up checkout…”
Need Help?
Section titled “Need Help?”Questions or feedback about the MCP Server? Reach out to ClickFunnels Support — we’d love to hear how you’re using it.
The ClickFunnels MCP Server is a Labs (Beta) feature and is being actively improved.